Thursday
Monday
Shop Hop was so much fun this year! Winners of prizes and drawings will be contacted after the drawing, announced and posted at http://onthetrailshophop.com/
good luck!
good luck!


Shop Hop 2014
2014 Dates Announced
We’ve got exciting news about next year’s Shop Hop. In 2014 an extra day will be added so that we start on a Thursday, giving you an extra long first weekend of Shop Hop! We know what conscientious planners some of you are, so you can now save the date for 2014.
2014 On The Trail Shop Hop
Thursday, April 24 – Saturday, May 10
click here to visit the shop hop web site for more info on shop hop and prizes
Wednesday
Helium is (finally) back in stock!
After a shortage of helium, we were finally able to get it back in stock. YAY! Helium balloons are so much fun.
Tuesday
Fabric Wall Art
Pin It


Create unique wall art with fabric and "Steam-a-Seam"
Re-positionable, comes off clean.
Following the instructions for the Steam-a-Seam, just stick the wrong side of the fabric to the Steam-a-Seam. I lightly ironed it for 2-3 seconds to give it a bit more grip, then cut out the shapes, fabric, Steam-a-Seam, and paper backing. Peel off the backing and stick it to the wall. It easily peels off to reposition. When you have it just right, smooth it down with your hand, then steam it a bit with your iron.
*Always test first in an inconspicuous area. This wall has a little bit of texture, but it stuck just fine.
Wednesday
Feather Earrings for all the Super Stars

Are you a Super Star? You know you are! Get your own stylish feather earrings and feather hair clips at Madsen's.

Parachute Cord Bracelets

Maybe you are more of the Sporty, Outdoorsy type, or making a gift for someone who is. Perhaps you are one of those lucky types who can be both!
Tuesday
Last minute gift ideas
 We have so many fun things at our store this year. Here are just a few ideas for last minute gifts.
 We have a variety of tinkerbell tins.
 This year, we have a big display of stocking stuffer toys for $1.99. My favorites are the bubble whistles (I'm not sure they are supposed to whistle, but my kids get a kick out of the sound), and the jacks.
Thursday
new at madsen's

Perpetual Magnetic Calendar : Also Available in an elegant black finish. These are sold online for 79.99 plus shipping! Our price: only $49.97!!
Monday
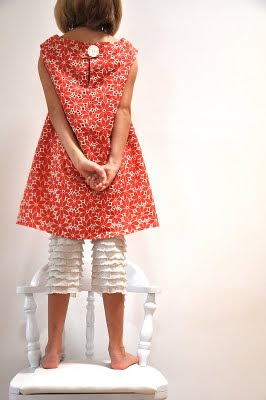
I love this free pattern!


 Super fast and easy instructions at Very Homemade. Lots of great pictures, and a free "Acrobat" download.
I am not a fan of turning tiny things inside-out, so rather than fight the 1" neck strap, I turned both raw edges under 1/4", pressed, and top-stitched with matching thread. It does look nicer turned, but the neck strap part is always hidden under a collar, anyway, so I figured, the fight wasn't worth it after making the first one. Also . . . this 30 minute project only took 15 minutes when I skipped that step! Wouldn't these make a great Christmas gift for a little man you know?
Sew a "Made with love by Grandma" tag onto the back! (or Auntie . . . or whoever you are . . . )
I love that it is adjustable, re-tie-able, and adorable! We just got in some super cute Superman and Batman fabrics - I'll post a picture when I make more ties out of them!
Tuesday
Ruffle Fabric -It's here!!

So Fun! Check out http://rufflefabric.blogspot.com/ for over a dozen links to free tutorials, projects, patterns, & instructions using the super cute ruffle fabric and fancy finished elastic that we have in stock now.
Wednesday

Mini watch faces - just arrived today!


I love the big watch faces and double beaded watch bands, but I have had a hard time wearing them . . . kind of large for my day to day jewelry, I suppose.
So - we just got this big shipment of mini watch faces, and they are really cute as a single strand bracelet-watch, and super fast and easy to make.
All you need is
- a mini watch face
- 2 small jump rings
- 2 small lobster claws
- some stretch magic (or just beading wire, if you don't want it stretchy)
- your choice of beads
*Loop the jump rings through the mini watch ends and close with small pliers.
*hook one lobster clasp onto the jump ring.
*tie the stretch magic onto the lobster clasp (or use a crimp bead to attach the beading wire)
*string on beads to the desired length
*tie other end to second lobster clasp (or use crimp bead on wire)
* hook second lobster claw to other jump ring, and you're done
It took me about 10 minutes, and I think it would make a great gift!
 Local author - local stories.
 Sparkle mini-purses: $4.99
Wednesday

 Free Pattern & instructions from Madsen's crafts and framing: from Cindy Click on the pattern or instructions to open them, view and print 8.5" x 11"

 Click here for "Owl Ideas"
 Click here for Give a Hoot for the Holidays - Owl Ornament Instructions
 Click here for Mel's Owl tutorial


Monday
CUDDLEE Pillow Pets: Only $14.99!


Okay, so I loooove the Zoobies - they are cute and fun and snuggle-riffic . . . but they are a bit expensive. So, if you're shopping for more than one special kid - maybe a gift with a smaller price tag will help to stretch the holiday dollars further . . . We now also carry the CUDDLEE PET PILLOW. They pop open into a pillow - there's not a blanket zipped inside like inside the Zoobie, but they are very soft and cute, and not as expensive
Magnet Boards

Everything you need to make your own fun and functional Magnet Boards with matching magnets.
Cover the magnetic metal sheet with fabric and frame it for a message center that looks like a piece of artwork.
Paint the metal sheet to match any decor, and make fun magnets out of buttons, glass, paper, and more!
Displays at the store are all for sale!
Magnet Board Free Instruction Sheet 1.0
**We carry 3 different finishes of magnetic metal sheets. Galvanized is shiny silver, perfect for projects where the metal shows, like mod-podge, rub-on, or decal boards. Paint Lock is pre-primed, and recommended for painted boards, or fabric covered boards, and Cold Rolled, a darker matte finish, for a more sophisticated look.
Mod-Podge Magnet board: Pick your favorite paper or fabric, and use modpodge to create your custom board.
Fabric Board: Cut a piece of fabric 4” larger than your piece of metal. Coat the Paint Lock metal with a spray adhesive. Super 77 is a good adhesive with a strong bond. Press your favorite fabric onto the adhesive coated board, carefully smoothing it out as you go, (try to keep it centered, but don’t worry if it is a bit crooked.) Wrap the extra fabric around the back, and tape it down. Finish by putting your new magnet board into your favorite frame.
Painted Board: You can use Ceramcoat craft paint and foam brushes, or, for a smoother, more even finish, use spray paint. The spray enamel in our model car section works well. Tape off stripes, use stencils, or make your own pattern to personalize. Make sure you let each coat dry when changing colors, or stencils.
To make holes, you can use a regular power drill. Drill a smaller pilot hole, then a larger drill bit to make the hole the size you need. Finish with eyelets or grommets, and tie a hanger through the hole using ribbon, rope, or cord.
Magnets: Glue glass to paper or fabric, then glue the magnet to the back, or pick your favorite
button or bottle cap, and glue magnet to the back. (hint ** glue glass to paper and wait for glue to dry before cutting out. It's really hard to cut out an exact piece and glue it on, but easy to cut around the glass after it's glued on and dry)

Click on the supplies page to view it larger.


1.Decide what order you want your ribbons to go in to make the pattern you like. Take your bottom ribbon, & the ribbon above it, and sew them, right sides together, with a 1/8th (or less, if you can) seam allowance. Proceed with the next ribbon up, and sew it to the free edge of the ribbon below, and repeat with the rest of the ribbons.
2. Then cut it in half. You should have two ½ yard pieces, one for the front, and one for the back. (Don’t worry if the edges of the ribbon stick out and don’t line up on the ends – you’ll fix that in a minute.)
3. Cut two 6 inch by 18 inch strips of your fabric – for the bag bottom. Place each piece (right sides together) along the bottom ribbon of each ribbon strip half, and seam.
4. Next, you are going to cut out the shape of the bag, & the bag lining. Stack up the front and back pieces, (which should be approximately 14” x 18” rectangles). cut the rest of the fabric in half, and stack it with the bag front and bag. (It should be a couple of inches taller, about 16 x 18)


Mark and cut as shown. (If you have a rotary cutter, it is easy to do all at once.)
Stack all 4 pieces, lining up at the bottom
5. Iron the fusible fleece to wrong side of all pieces.
6. With coordinating thread, stitch along the edges of the ribbon. (The striped ribbon we used could also be stitched through the white stripes on the ribbon, then you could use all white thread)
7. (right sides together) Sew the front and back together at the side seams, then the bottom seam of the bag with ¼” seam allowance. Create a bottom Gusset. Fold the bag with the right sides together so the bottom seam is centered and facing up, as shown, to make a triangle. Measure 3’ from the triangle point on each side, mark across, and stitch across. (If you want the bottom of your bag to be narrower, measure 1 or 2” instead)


*Repeat step 7 with your lining fabric, but use 1/2” seam allowance. This should help your lining fit inside the bag.
8. For bag strap side loops: Cut a 1”x 4.5” strip of fusible fleece, and a 9” piece of ribbon. Fuse the pellon to half of the ribbon in the center (on the wrong side,) then fold ribbon over and stitch together each side, and down the middle.


If you have sewn a bag with a lining before, this will be pretty easy. If you haven’t, it’s kind of tricky to explain, but easy once you see it . . .
Turn your bag right side out.
Turn the lining inside out.
Put the bag and ring straps inside the lining. The right sides should be together. Your lining might be longer, but this is okay, since it is going to be the top of your bag, too
Line up the top of your bag (ribbon edge), and the top edge of the lining, and pin all the way around. Tuck the “o” ring and strap in the middle at the side seams and pin in place.
Sew together around the top using ¼” seam. Leave about a 6” opening to turn everything right side out. A walking foot may help over the side seams with those thick straps in there, or you may have to do some hand stitching to get through.

(different bags, but these pics show how straps are tucked down inside, with the bag inside the lining- and the lining is inside-out.)
THE FUN PART:
Reach through the opening you left, grab the bag, and pull it right sides out. Stuff the lining down inside. Cut a piece of plastic canvas to fit the bottom of the bag, and stuff it down into the bottom of the bag through the opening and under the lining. If you chose to put on bag feet, they can also secure the plastic canvas to the bottom of the bag. The nail heads have prongs that go through the bag bottom, then through the holes in the canvas, and bend over both to secure. If you chose not to attach bag feet, it might be a good idea to tack the plastic canvas base to the bag with a few stitches (needle and thread going through opening) to prevent it from shifting if you should need to wash your bag later.
Attach the magnetic snap closures through the opening at this time, as well.
Pin the top of the bag so the lining folds over onto the front, and pin the opening closed. Top stitch all the way around.
Loop the 2 yards of ribbon through the “O” (or “D”) rings to a comfortable length, and tie in a bow.
Be creative – add pockets, different handles, etc, and customize one today~
This bag alternated strips of fabric and ribbon.
purchase 1/8th yard more of fabric to make three 1.5” strips.

& these have pre-made handles, and tie at the top with ribbon.
2. Then cut it in half. You should have two ½ yard pieces, one for the front, and one for the back. (Don’t worry if the edges of the ribbon stick out and don’t line up on the ends – you’ll fix that in a minute.)
3. Cut two 6 inch by 18 inch strips of your fabric – for the bag bottom. Place each piece (right sides together) along the bottom ribbon of each ribbon strip half, and seam.
4. Next, you are going to cut out the shape of the bag, & the bag lining. Stack up the front and back pieces, (which should be approximately 14” x 18” rectangles). cut the rest of the fabric in half, and stack it with the bag front and bag. (It should be a couple of inches taller, about 16 x 18)
Mark and cut as shown. (If you have a rotary cutter, it is easy to do all at once.)
Stack all 4 pieces, lining up at the bottom
5. Iron the fusible fleece to wrong side of all pieces.
6. With coordinating thread, stitch along the edges of the ribbon. (The striped ribbon we used could also be stitched through the white stripes on the ribbon, then you could use all white thread)
7. (right sides together) Sew the front and back together at the side seams, then the bottom seam of the bag with ¼” seam allowance. Create a bottom Gusset. Fold the bag with the right sides together so the bottom seam is centered and facing up, as shown, to make a triangle. Measure 3’ from the triangle point on each side, mark across, and stitch across. (If you want the bottom of your bag to be narrower, measure 1 or 2” instead)

*Repeat step 7 with your lining fabric, but use 1/2” seam allowance. This should help your lining fit inside the bag.
8. For bag strap side loops: Cut a 1”x 4.5” strip of fusible fleece, and a 9” piece of ribbon. Fuse the pellon to half of the ribbon in the center (on the wrong side,) then fold ribbon over and stitch together each side, and down the middle.

If you have sewn a bag with a lining before, this will be pretty easy. If you haven’t, it’s kind of tricky to explain, but easy once you see it . . .
Turn your bag right side out.
Turn the lining inside out.
Put the bag and ring straps inside the lining. The right sides should be together. Your lining might be longer, but this is okay, since it is going to be the top of your bag, too
Line up the top of your bag (ribbon edge), and the top edge of the lining, and pin all the way around. Tuck the “o” ring and strap in the middle at the side seams and pin in place.
Sew together around the top using ¼” seam. Leave about a 6” opening to turn everything right side out. A walking foot may help over the side seams with those thick straps in there, or you may have to do some hand stitching to get through.
(different bags, but these pics show how straps are tucked down inside, with the bag inside the lining- and the lining is inside-out.)
THE FUN PART:
Reach through the opening you left, grab the bag, and pull it right sides out. Stuff the lining down inside. Cut a piece of plastic canvas to fit the bottom of the bag, and stuff it down into the bottom of the bag through the opening and under the lining. If you chose to put on bag feet, they can also secure the plastic canvas to the bottom of the bag. The nail heads have prongs that go through the bag bottom, then through the holes in the canvas, and bend over both to secure. If you chose not to attach bag feet, it might be a good idea to tack the plastic canvas base to the bag with a few stitches (needle and thread going through opening) to prevent it from shifting if you should need to wash your bag later.
Attach the magnetic snap closures through the opening at this time, as well.
Pin the top of the bag so the lining folds over onto the front, and pin the opening closed. Top stitch all the way around.
Loop the 2 yards of ribbon through the “O” (or “D”) rings to a comfortable length, and tie in a bow.
Be creative – add pockets, different handles, etc, and customize one today~
This bag alternated strips of fabric and ribbon.
purchase 1/8th yard more of fabric to make three 1.5” strips.
& these have pre-made handles, and tie at the top with ribbon.
Subscribe to:
Posts (Atom)